Create a Vehicle Service App Using Google AppSheet Part — 1

Welcome !
In this blog I am going to show you how to create a Vehicle Inspection App using Google AppSheet . In this app the user can place a service for his car by filling out a form. This app will have the following features:
(1) The user can place a service order.
(2) Filter data for specific users. Manager of the service centre should be able to see data of all users.
This blog is divided into two parts:
(1) The first part will show you how to create and setup the app, followed by placing our first service order.
(2) In the second part I am going to show you how to filter data for specific users.
So let’s get started.
Step 1: Sample Google Sheet.

This is the first sheet that I will be using .If you prefer working with it, you can make a copy of it by clicking here .The first sheet contains all the following details :
(1) Email address of the user.
(2) Name of the vehicle
(3) Model of the car
(4) Year of the car
(5) Colour of the car
(6) Select the service
(7) Select a Date
(8) Select a Time
(9) Notes
Step2: Create the App:
After you are done setting the sheet up, it’s time to create the app . In order to do that follow these steps:
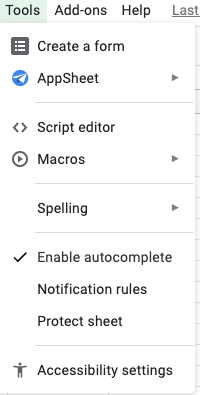
(1) Click on Tools .

(2) Click on AppSheet, and then click on Create an App .

(3) After you click on it, you will see something like this.

Here you can see that the app has been successfully . On the right side of the screen you can se the app preview, that shows you what your app looks like to the user .

This is the second sheet that I will be using. This sheet contains the following details:
(1) All the services that can be done .
Now it’s time to add the second sheet to the app. To do that, follow these steps :
(1) Click on Data .

(2) Next you have to click on the Tables button .

(3) Next you have to click on the plus sign that says New Table .

(4) After clicking you will see something like this.


Here it will ask you to choose the name of the spreadsheet . After selecting the spreadsheet, you have to specify the second sheet called Services .

(5) After selecting the sheet, click on the Add this Table .

(6) Now you can see that the sheet has been added to the app .

Even after adding the sheet you cannot see it in the app preview. In order to add Services in the app view, follow these steps:
(1) Click on UX .
(2) When you click on UX it will show you the views in the app .

(3) In order to add a new view you have to click on the button that says New View .

(4) Here it will ask you to give a name to the view and then it will ask you to specify the name of the sheet. After this if you want you can make some more changes to it .
(5) After setting up everything, click on Save .

(6) This is what you will see after you click Save .

These are the services that the user has to choose from.In order to add it to the form, follow these steps:
(1) Go to Data .

(2) Go to Columns and click on Inspections .


(3) Here you can see all the columns present .

(4) Here we have to change the Select the Service part, so click on the button next to it .

(5) On clicking the edit button, you will be shown the properties of the column .

(6) Here you have to change the data type to Ref, so that it can take the Services sheet for reference .
(7) After clicking reference, it will ask you to specify the sheet name . So you have to select Services Sheet .

(8) After doing this, click on done and go ahead and save it .
After saving it. Go to the app preview and click on inspections and click on the plus sign .
Now when you click on it you will see something like this.

Scroll down to the Select your Service option, where you can see a dropdown arrow. When you click on it, you can see all the services .

Now let’s go ahead and place our first service order . To do that follow these steps:
- Click on the plus sign.


- Now enter the email address, enter the name of your car, enter the model of the car, enter the colour, select the service and then specify the date and time of the service.
- After entering the details click on Save. After clicking on save you will see something like this .

Here you can see that the service order has been recorded.
That’s all for this blog. In the next blog I am going to show you how to filter data for specific user .
